Posters on the Cheap
The two most common types of presentations at academic conferences are papers and posters. In the past, many presenters concentrated on paper presentations. However, posters are increasingly popular as an alternative to paper presentations. Poster sessions encourage interaction, and are often better for engaging interested colleagues in conversations about your work. This is particularly helpful for work in progress, since the "audience" can more easily give you feedback. Since you are not giving a formal talk, but rather chatting with with people who stop to take a look, the milieu is intrinsically more conversational and relaxed. Posters can also be a great way to break into the conference scene, since poster sessions tend to be a bit less competitive than paper presentations.
You can find a lot of resources for creating scientific posters on the internet, but here are a few to get you started:Creating Effective Scientific Posters
The rest of this page will tell you about how to make and transport the poster as cheaply as possible.
Most people do their posters by creating one giant "PowerPoint" slide. If you do this, you have two problems. First, you will have to print poster sized. Second you will have to get it to the conference where you will present.
The most expensive, but perhaps most convenient way to get your poster printed is to have a copy shop do it. Some, like Kinko's, will even "solve" the transportation problem. They will print your poster at the shop that is closest to the conference hotel where you will be presenting, and have it ready for you when you arrive in town.
There are lots of places that will print your poster for considerably less money, you can Google a long list of them:
These web-based operations are still not cheap by my ultra-cheapskate standards, but they are better. You should also be aware that, in addition to shipping time, there is often a "cue" such that it can take several days from the time you order until they can print your poster. You should not even consider a place like this unless your poster is in final form at least two weeks before you present it.
Alternatively, your university may be able to print your poster for you. Some will do it ofr free. If yours will do that, skip down to the part about the poster tubes. There will be no better option. Most charge a fee, but it's often better than the copy shops. There are two units at my university that print posters for a fee:
Printing Poster at the FIU GIS Lab
Poster Printing at the FIU Engineering Information Center
As you can see, the FIU price is not as good as some places on the web, better than the copy shop price, more convenient than the web, but not as convenient as a copy shop...
Printing on the Cheap
If you want to do a true "PowerPoint" slide poster, have access to a color printer, and don't want to pay to have a shop print it, there are some ultra-cheapskate ways to cut costs.
You don't even need Microsoft PowerPoint. Here's a good alternative, that will produce just as good a poster:
Libre Office Impress or Open Office Impress
...and Impress is available for free.
If you don't mind a little cutting and pasting--literally with scissors and paste (or tape)--you can print your poster by using an online service. Essentially you export your powerpoint poster slide as a graphic image and upload it to a website. The software at the site then turns the image into tiles and in a PDF file that you download to your computer to print out.
Here is an excellent article about two of these sites although I am sure there are more of them:
If you would rather just go to the tiling sites than read about them, here's the one I recommend:
In addition to these resources, many printers also have a feature that allows them to print oversized images by tiling. There is a way to do this in PowerPoing. The "pro" version of Adobe Acrobat also has this feature.
Once you have printed your tiles it is relatively easy to cut out and tape the poster together. You can take tape, and borrow scissors (don't take them on the airplane!) from most hotels. I have found that the finished product looks remarkably good. Not quite as good as the expensive posters from Kinko's or the professional poster printing services, but still pretty good.
Poster Tube
If you want to carry a commercially printed poster, or if get your poster totally right, cut and pasted before you leave for the conference, you will need a tube to carry it in. There are places to get a poster tube for free. For example:
You want to check in advance to make sure your local office actually as a box. My local UPS store does not carry them. They are only free if you can find them ;-)
These tubes are disposable, so not too good for a poster that you will be bringing back home with you. If I pay $80 to print a poster, I am bringing it back and it will hang somewhere! If it's a "one off" poster that I tile and print, it will not be coming home, and a free tube makes good sense.
A cheap cardboard tube can be purchased at packing stores or at office supply stores sometimes, but they often want you to buy a bulk amount. Even cheap cardboard tubes cost about what my DIY plastic pipe tube costs, so I have never bought one.
You can also get plastic tubes--even leather covered tubes--made just for posters. The cheap plastic ones start around $15+shipping. Do you even have to ask what the tooled leather poster tubes cost?
Make your own Poster Tube
I made my DIY tube for $7 out of materials you can get off the shelf at any hardware store. My tube is stronger, more versatile to use and half the cost of the cheapest commercially available tubes.
All you need are three things:
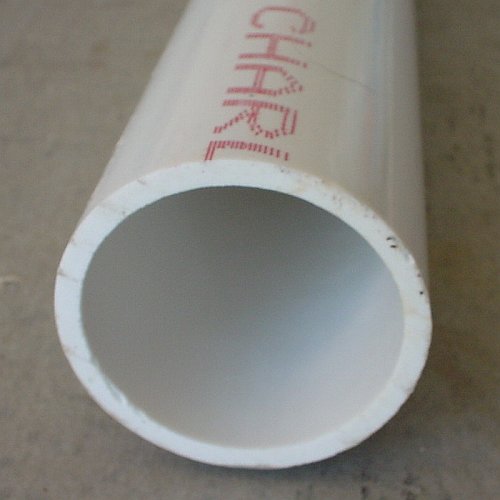
1) 3 to 4 lengths of 2-inch PVC pipe, each about 13-14 inches long.
The hardware store will cut you some pieces to any length you want. You can also cut PVC pipe with a hacksaw or a coping saw at home.
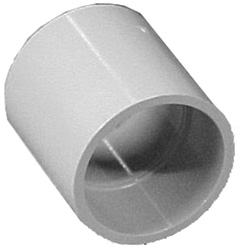
2) You will need two to three couplings. These fit over the ends of the tube sections, and connect tube sections together.
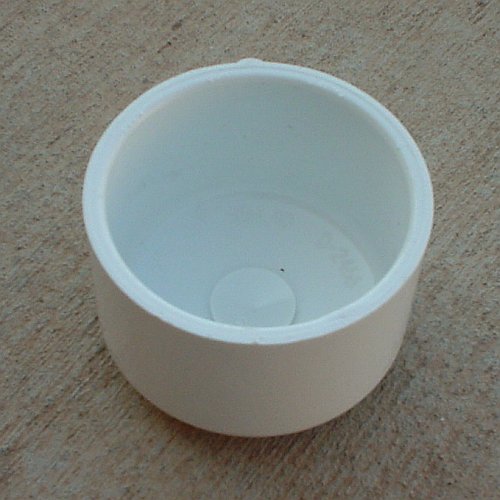
3) You will need a cap for both ends.
I sanded off any rough edges, and then just stuck them together. They fit tight, and don't need any glue or anything. Here's what the finished product looks like:
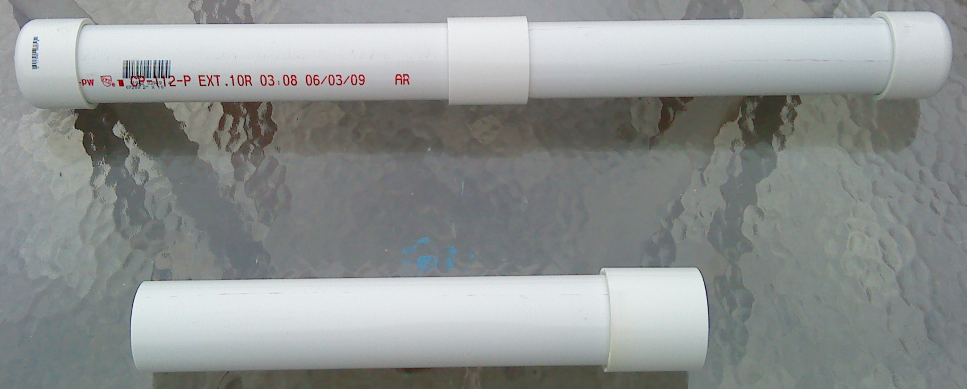
The assembled tube will hold a poster that is 24-26 inches tall (shortest length). Add another section, and the tube will carry a tube with a 36-40 inch poster, which is the largest most conferences take. You can keep adding sections for any size poster.
Generally they'll let you take it on the airplane, but if you need to check it, you may want to tape the joints with packing tape.
One nice thing about a PVC pipe tube is that you can disassemble it and put it in your suitcase to take home. Disassembled, it will fit easily in most roll-aboard luggage.
I have gone through security with no questions asked most of the time. However, every once in a while the TSA wants to see the tube, so, if you put the disassembled tube in your carry on luggage, keep it on top.
Most airlines (at least in the US) will let you carry on a poster tube. It fits easily in any overhead bin. I have always carried mine on board without airline folks asking me any questions about it. They can, however, tell you to check it. Thin cardboard or free tubes won't survive that very well. Taped, my pipe tube will be fine, as will most tubes made for carrying posters. Although I have never had a problem carrying mine on, but I carry a small roll of packing tape just in case.